


How to Use a X-Box Controller with OpenCPN
We use OpenCPN as our primary navigation tool, running it on a Raspberry Pi 3B using OpenPlotter as the basic platform. Although OpenPlotter has a lot of additional features, we don’t actually use them, just OpenCPN as our chartpolotter. We have an Eyoyo LCD screen at our helm station.
It all works well, except that operating OpenCPN with a large wireless keyboard or even a mini keyboard really does not work great. The large one is too cumbersome, the small one too fiddly.
So we have now switched to using a wired x-box 360 controller. Well, actually, we are using a Logitech F310 which we bought from the Source in Canada for C$25. It plugs into the Raspberry Pi with an ordinary USB cable. We have an extension USB cable that goes to a panel-mounted USB 3.0 socket next to the Eyoyo screen.
That works great. But it does require some configuration to get it working. Since I just spent an entire week getting it all working correctly, I thought I would save you some time by outlining all the steps. To do this you are going to have to use some command line Linux commands by means of the Terminal, which you can open by going on the desktop to Main Menu -> Accessories -> Terminal. Don’t forget to put sudo at the beginning of each command so as to grant the comman admin privileges.
You will also need to be connected to the internet.
This assumes that you are using Raspbian 10 (Buster). It will probably work on later versions, but this is what we have, and what works for us. Actually, we just upgraded to a Raspberry Pi 4B with Bullseye, and it works even better on that. Will this work on Windows? Yes, but you will have to figure out how to install xboxdrv and get it running on initial boot. Also, note that I am no expert on Linux. This is what I managed to put together after a whole week of working on it. I hope it works for you too, but if it doesn’t you are on your own in figuring it out. Google is your friend. When you do look stuff up, always make sure that what you read applies to your current operating system – eg Buster, not Stretch etc.
NOTE: when you create these files, and especially the shell scripts (that end with .sh) you need to do this either within the raspberry pi, or on another linux system or, if you do it in windows, make sure your text editor (eg. notepad++ ) uses Linux line endings (LF) and not windows (CR LF) or Mac (CR) line endings, otherwise these will likely not work. There is a setting for this in the Edit tab on Notepad++.
Before you start this, make sure you backup your current working SD card so that you can recover to it if you screw something up. (google “how to backup raspberry pi sd card”)
So, start by exiting OpenCPN and returning to the Desktop environment.
1. Install xboxdrv
This is the utility that will convert your controller to a keyboard and mouse so that you can manipulate OpenCPN. You can read about it here. To do that type into the Terminal the following:
sudo apt-get update
sudo apt-get install xboxdrvsudo rmmod xpad
sudo modprobe uinput
sudo modprobe joydev
2. Write the Configuration Files
These tell xboxpro how to map the keys on your controller to keyboard and mouse events so that it will do what you want it to do.
Navigate to the location for the files:
cd /usr/share/doc/xboxdrv
ls
This will give you a list of files including a directory called examples which contains some example configuration files that you can play with. But you don’t need them.
Create a new configuration file by typing in:
sudo nano logitech.xboxdrv
This will bring up the ‘nano’ text editor.
Into this type (or copy and paste) the following (lines that begin with # are comments that don’t have any programming action. If a line has text but does not start with # Linux will try to execute the line as code, so make sure any line with comments in it begins with the hash #.):
# Mouse Emulation
# ===============
#
# This configuration file emulates a mouse. Both sticks control the mouse.
# The left one allows for slow fine controll, the right for more rapid
# movements.
# The controller buttons are configured as follows:
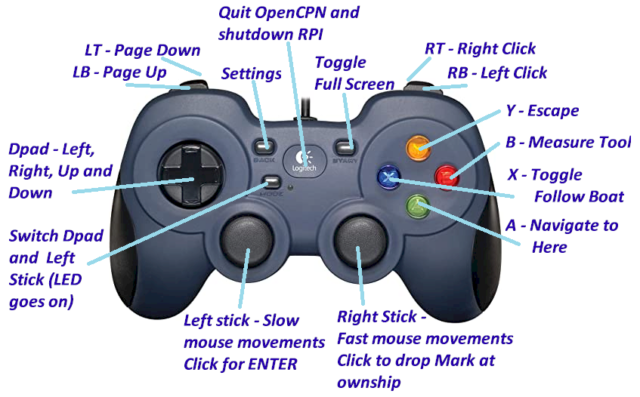
# LB does page up (i.e zooms into the chqrt) and LT does #page down (zoom out).
# A (Green) = Navigate to here
# B (Red) = Start Measure tool ( = M key). If you want to drop a MOB marker instead, edit the appropriate line below, but you may keep dropping it by accident.
# X (Blue) = Auto follow boat (= F2) toggle on/off
# Y (Yellow) = Escape# Left Stick press down = Enter
# Right Stick press down = Ctrl-SPACE = Drop MOB Mark at cursor (to
#enable this you will need to manually edit the OpenCPN config file, the location of
#which can be found by clicking the Help menu tab, and then the About item.
#NOTE: you must edit this whle OpenCPN is CLOSED otherwise your changes
#will be overwritten. Change the setting for SpaceDropMark to -1 (0 will
#deactivate it)# RB = Left mouse click
# RT = right mouse click (usually brings up a menu)# Dpad = left, right, up and down keys (use these to
# pan the display or move up and down in menus# BACK = open settings/options dialogue
# START = F11 toggle full screen# Mode = this will light up the LED and swtich the
# functions of the Dpad and the left stick[xboxdrv]
#ui-clear=true
silent = true
detach-kernel-driver = true
mouse = true
trigger-as-button = true[axismap]
Y2=Y1
X2=X1
X1=X2
Y1=Y2[ui-axismap]
X2^dead:1000 = REL_X:750:-1
Y2^dead:1000 = REL_Y:750:-1[ui-buttonmap]
x = KEY_F2
#b = KEY_LEFTCTRL+KEY_SPACE
#The line above will drop a MOB marker at the current GPS positionb = KEY_M
#The line above will turn on the Measure Tool. Use the Y button to ESC from that.a = macro:navhere.macro
y = KEY_ESCrb = BTN_LEFT
rt = BTN_RIGHTlt = KEY_PAGEDOWN
lb = KEY_PAGEUPtl = KEY_ENTER
tr = KEY_LEFTCTRL+KEY_SPACE
#This will drop a MOB mark when you press down on the right joystick[ui-buttonmap]
dl = KEY_LEFT
dr = KEY_RIGHT
du = KEY_UP
dd = KEY_DOWNstart = KEY_F11
back = KEY_LEFTCTRL+KEY_COMMA
guide = macro:shutdown.macro[ui-axismap]
X1^resp:-30768:-15284:-8899:-5469:-872:-300:-200:-100:-50:0:50:100:200:300:872:5469:8898:15283:30767
Y1^resp:-30768:-15284:-8899:-5469:-872:-300:-200:-100:-50:0:50:100:200:300:872:5469:8898:15283:30767
# This defines the speed of the right joystickX2^resp:-3768:-200:-100:0:100:200:3767
Y2^resp:-3768:-200:-100:0:100:200:3767
# This defines the speed of the left joystick (much slower)# EOF #
Now we need some macro files:
The first is to shutdown the whole system when you press the Guide Button
sudo nano shutdown.macro
and then insert this text (the ‘0’s are zeros):
send KEY_LEFTCTRL 1
send KEY_Q 1
wait 1000
send KEY_LEFTCTRL 0
send KEY_Q 0
wait 50
send KEY_LEFTMETA 1
wait 50
send KEY_LEFTMETA 0
send KEY_UP 1
wait 50
send KEY_UP 0
send KEY_ENTER 1
wait 50
send KEY_ENTER 0
send KEY_ENTER 1
Save and exit using ctrl-X
With this we also need a shell script to run it:
sudo nano shutdown.sh
and the contents (type this into the text editor):
sudo shutdown now
Save and exit using ctrl-X and then make executable with
sudo chmod +x shutdown.sh
Next is the macro to set up the temporary ‘Navigate Here’ route:
sudo nano navhere.macro
and the contents:
send KEY_LEFTCTRL 1
send KEY_M 1send KEY_M 0
send KEY_LEFTCTRL 0send BTN_RIGHT 1
wait 50
send KEY_DOWN 1
send KEY_DOWN 0
send KEY_DOWN 1
send KEY_DOWN 0
wait 50
send KEY_ENTER 1
wait 50
send KEY_ENTER 0
Save and exit using ctrl-X
Now create a new startup file by typing in:
sudo nano logitech.sh
Into this you can insert the following text (only two lines):
#!/bin/bash
sudo xboxdrv -D -c /usr/share/doc/xboxdrv/logitech.xboxdrv –silent & sleep 1
When you have done that, save it by typing Ctrl-X and then following the prompts. This should bring you back to your command line prompt.
Now you need to make this file executable by typing:
sudo chmod +x logitech.sh
Test all this as follows:
plug in your controller and make sure the switch on the bottom is set to ‘X’ for x-input.
type in:
sudo logitech.sh
This will run the script that will start up xboxdrv that will (hopefully) recognise your controller and then use the configuration file to map the keys.
Now we need to set it up so it will run at boot. Assuming you are using a LXDE desktop (eg OpenPlotter) first we edit the autostart file:
sudo nano /etc/xdg/lxsession/LXDE-pi/autostart
Type in the startup command at the end of the file before the exit 0 line (if there is one):
@bash /usr/share/doc/xboxdrv/logitech.sh &
Save it with ctrl-x.
Now reboot the system
sudo reboot now
and the game controller should now be recognised at boot up, even if you plug it in later.
You should now be able to use the joysticks as a mouse. Using your mouse you can now launch OpenCPN and play around with it, using your controller. Once OpenCPN is launched you will probably have to left-click (RB button) so the controller knows to work inside OpenCPN.
When you have done that, here is a tweak for OpenCPN that will make it easier to use:
Go to the OpenCPN Settings dialogue (press the ‘start’ button – just to the right of the dpad – on the controller). Then go to User Interface and about halfway down you will find an option to Enable Touchscreen interface. Turn this ON as it will make it easier for you to hit a target (eg a waypoint) with your cursor. Then when you are near a target you can left-click it to select it. It will then stay selected (highlighted in yellow) until you deselect it. In the meantime you can drag it somewhere by clicking on it again and holding in the RB (left click) button and dragging the item with either of the joysticks.
If you need to actually type in something (eg to name a waypoint) you can, obviously, plug in a real keyboard, or you can use a virtual one. To do that press the ‘start’ button on the controller which will take it out of fullscreen mode (assuming you were in that). Then you can find the keyboard either on the top toolbar, or else go to the Raspberry start icon -> Accessories -> Keyboard.
Now go and make another (dated) backup of your SD card. If you keep a series of dated backups you can always revert back to the last one that worked properly.
That’s it, hope it works for you: 🙂
Now that this has been posted for a few years… I would love to know if there are any updates or further tweaks. I find the greatest challenge of my OpenCPN Pi setup is user interface. I have struggled to find the right input device for easy map interactions. A mouse is cumbersome on a sailboat and all the bluetooth type devices turn off after 20ish minutes of downtime.
Thanks
Actually, when we upgraded our Pi to version 4 our X-box hack no longer worked, so now we are using a wireless mouse which occasionally falls onto the cockpit floor, but mostly seems to be ok. Maybe a wired mouse would tether the mouse so it could no longer escape.