Ultimately YOU have to be The Expert
You know the saying “If you want something to be done properly, do it yourself”? Well, it seems to me that applies more than ever when it comes to maintaining a yacht.
On land, back in your home, if you have a problem with the roof, or the central heating, or a leak from the bathroom, all you do is look up the right tradesman in the Yellow Pages, give him a call, and get him over to fix the problem. The least handy of people can do it as no knowledge of the problem or the underlying system is required. The reason for that is that:
a) The systems are all pretty standard. They work the same way, and they use standard parts. In many cases fixing them is just a matter of pulling out the bad part and replacing it with a new one.
b) The systems are easily accessed and, again, require no specialist or unique knowledge to gain access to do the fixing.
c) The systems are less critical. If the repairman does a bad job, you may have to bring in a different one to fix the fix, which is a pain in the butt. But rarely is it a catastrophe or a life-or-death event.
Quite the opposite is the case on most yachts. For example:
a) You may have some standard piece of equipment. That is, it is standard in the country in which it was installed. But is it standard or available here, half way around the world? More often than not the system was custom built for your yacht to solve a particular problem or achieve a particular goal. Which means that the repairman needs to first understand your system before he can even begin to think about solutions.
b) Even if the equipment is standard, it probably wasn’t installed in a standard manner.
c) Everything on a yacht is subject to an extremely harsh and corrosive environment. That means that equipment gets pushed to the limits. Any failures in design or construction will be found out. Not only that, but any errors in choosing the correct materials for the job will be found out. For example, a pulley block may be nicely made of tough plastic and 316 stainless steel. But then uses a clevis pin, made of 200-series stainless steel to hold it together. What happens? A bit of salt and a bit of time and the clevis pin corrodes and falls apart. The whole block then falls apart. And what happens then? Maybe the rig collapses, or a line under tension flies loose and knocks a crew member over board. Reminds one of that nursery rhyme:
“For the want of a nail, the shoe was lost,
for the want of a shoe, the horse was lost,
for the want of a horse, the battle was lost,
for the want of a battle, the kingdom was lost.
And all for the want of a nail.”
Who was it that chose that particular brand and model of block to use? Did he understand the corrosion issues with different grades of stainless steel? Did he even know there were different grades of stainless steel?
Yes, tiny issues like this can have catastrophic effects which could even result in loss of limb or life. Are you going to trust this to the young sales assistant in the local chandlery?
Here are some example from Life Part 2:
Installing the Wind Generator
First we had to choose which brand and model of wind generator to use. That involved two types of research:
The first was looking up technical specs on power output and so on. The key is high power at low wind speeds since every model provides heaps of power at high wind speeds, but how often are you anchored in high winds?
The second was to look around at existing installations on other people’s yachts. That produced two key insights: Which models were turning in low winds, and how much noise did they make? From this, the clear winner was the D400, which is what we installed.
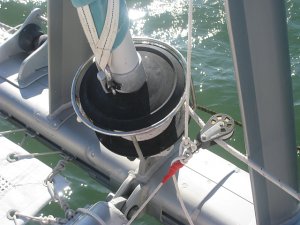
The next step was to get it installed. For this we went to Tech Nick in Prickly Bay, Grenada. He has an excellent reputation for working with metals and did, indeed, do an excellent job with building our tower.
BUT, what he didn’t do an excellent job of was choosing the best place to put it, and the best height for the tower. And this is where our lack of expertise also failed. You see, we were relying on him and his experience of installing lots of such generators on yachts, so we went with his suggestions. This ended up with two problems:
1) The tower is too low. Yes it works, but it would work better if it were 18 inches taller. In fact he did initially have it that long, but it looked awfully high to me, so we cut it shorter. I was relying on him to advise instead of relying on my own research to advise on this. Truth to tell, I hadn’t thought about how high to have it, I had been too caught up trying to decide which model to get!
2) The tower ended up too close to the boom. As on goes onto a broad reach, the boom goes out and up, and the wind generator points aft, such that the blades are aligned across the boat. At a certain point they blades and the end of the boom meet and Oops! There goes on of the blades! When we positioned the wind generator on the top step we sort of eyeballed it to see if it was clearing the boom, but we should have been much more precise in checking this out before actually installing the pole. Hard to do, as you need several people to hold the pole up (heavy, with the generator at the top), and then someone to push the boom out and someone to turn the generator to see if you can get the one to hit the other.
In the end, once we realized what had happened, we had to move the generator down and aft one step to create greater clearance. And that, of course, makes it even lower than it was, so we miss that extra 18 inches of height even more now. But at least we no longer break any blades on it.
Building our ‘Sofa’
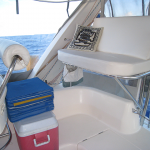
Our ‘sofa’ is the raised padded seat that we had built for us in St. Martin. It is made of anodized aluminum and is placed behind the helm, allowing a very comfortable place to sit while still having a good view forward of both the sea and the navigation instruments. Once again we had this built by an expert in metal construction and, once again, he did a great job of the fabrication.
With one exception.
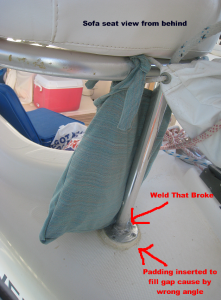
At one end the sofa is supported by a vertical pipe which sits on the deck (see photo). While we were designing this (I built a mock-up using pvc piping) I suggested that the base of this pipe would have bolt hinge attaching it to the base plate. However, the engineer figured it would be simpler and easier to simply weld the base plate on. He built the structure and with the base plate just tacked on. We then installed it so that he could determine the correct angle for that plate to be fitted.
Unfortunately, once the bench was finally installed, the angle of the plate didn’t quite match the angle of the deck to which it was screwed. One bouncy week of sailing to Bermuda, and the stress simply ripped that weld apart.
Fortunately in Bermuda we found a great guy who not only welded our davits which had also broken their welds, he also could weld our aluminum back together.
This time when we installed it, I put a whole bunch of epoxy padding under the plate to fill in the angle and to make sure that the plate was sitting completely flat on its surface. Hopefully now it will hold up better!
Securing Shackles
Fairly early on when we first took Life Part 2 out of charter we had the mainsheet block fall off the end of the boom. How did this happen? The pin in the shackle had come loose and fallen out. As a result the block fell out. By some miracle both of them were still there sitting on the solar panels so we could quickly put it all together again.
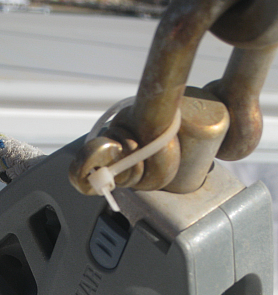
This time, however, I secured the pin in place with a cable tie. This makes sure the pin can’t rotate, and so cannot come undone. I then went over all the shackles on the boat and found that NONE of them had been secured in this way and, indeed, several of them were loose and threatening to fall out too!
But that wasn’t all. Half way across the Atlantic the mainsheet block separated from the traveler. Unfortunately in this case it was a double block secured by two shackles, but just one of the shackles came off. This put the block at an awkward angle with the result that it quickly got ripped apart by the force of the mainsheet. Fortunately we had some spare blocks (we stole them from the spinnaker) and we were able to get the mainsheet rigged again.
So what had gone wrong this time?
The shackle had been secured by a clevis pin, and the pin secured by a split ring. So far so good.
Except that when the rig is slack, for example in light winds, the mainsheet droops down and lies across the traveler. As the rig bounces back and forth in the waves, the mainsheet would be drawn across the traveler car and all that is attached to it. On occasion the sheet would snag one of the ends of the spit ring and pull it a little bit. Once out of line, that end would be more easily caught, and pulled a bit more. Eventually the whole ring got pulled out of the clevis pin. The pin then fell out, and the block exploded. The cost of the ring? About 10 cents. The replacement block, when I finally tracked one down in England? $150.
But, the lesson here is that a split pin is the wrong thing to use if there is any risk of it being snagged by something. Instead one should use a split pin. If that gets snagged, it gets deformed more, making it LESS likely to fall out, rather than more likely.
So, another trip around the boat replacing a whole bunch of split rings with pins.
Monitoring Battery Consumption
Our aim is always to minimize the use of the engines. We don’t like to motor if we can sail, and we especially don’t like to run the motor simply to charge up the batteries. Which is why we installed the wind generator.
A crucial part of managing energy consumption knowing what is going in and out of the batteries so that one can know the current state of charge of the batteries. For this purpose we have a fancy battery charge regulator and monitor that measures all the current flow in and out of the battery, keeps a running total, and reports the current state of charge. In order to do this there is a special shunt which is installed just before the battery terminal. The monitor is wired in parallel with this shunt and draws off a tiny portion of the current that is going through the shunt. By measuring this current, and multiplying it by the appropriate factor, the monitor knows the current going through the shunt. This is just standard current monitoring technology, nothing fancy.
But imagine my surprise when I discovered (during the installation of the wind generator) that there was a whole bunch of cables that were bypassing this shunt and going straight to the battery terminal! That meant that all the current going through those cables was not being measured, making the monitor totally inaccurate! Whoever had installed either the monitor or these other cables (can’t remember what appliances they fed) had done it wrong.
Ordering a New Genoa
When we boat Life Part 2, we decided to get new sales, as we were offered a great price by Doyle, who supply the entire Moorings fleet with sails. That means they are very familiar with Leopard cats and know all about the sails that they need.
Or so we thought.
So, we bought a new genoa and fitted to our furling system. Now, the purpose of jib furlers is that you can leave the sail attached to the forestay, yet still have it protected from the elements (and especially the UV rays). This is achieved by sewing a strip of cloth to the leech and foot of the sail so that when the sail is rolled up this strip of cloth covers up all the valuable and fragile sailcloth. That is the green material you can see covering our genoa on our boat. It is sewn to ONE side of the sail – the outside when it is rolled up.
Of course, which side that is, depends on which way the sail is rolled.
So, imagine our surprise when we discovered that the sun protection was sewn onto the wrong side of our new genoa! When we rolled it up, the protection was inside the sail, doing no good at all.
To accommodate that, we had to roll the sail up in the other direction. But that meant that we had to wire up the control lines for the furler onto the other side of the drum. And that, in turn, meant that it was no longer a straight line, but had to bend around the back of the martingale, causing extra friction. We solved this problem by rigging up a small block to lead the line in the right direction.
And all because we didn’t specify which side of the sale the sun protection should go on – because we had never even thought about it as an issue – just assuming that Doyle knew how to build a genoa for a Leopard cat.
The Moral of the Story
These are just a few examples of some things we have learnt on Life Part 2. In each case the problem had occurred because so me ‘expert’ had done it wrong.
So, what is the moral of the story? Be prepared to learn about all the systems on your boat. Understand what they do, and why they do it.
And before you hire someone to do a job for you, make sure you understand all that is involved in that job – including what materials to use and avoid – before you hire them.
I can’t recommend too highly the books that we have onboard. Buy them and READ them – don’t just leave them on the shelf until you have a problem somewhere. Actually read them in advance so that you understand and know how to identify problems before they arise. And when you have read about a certain system, go and look at your own system and see how it stacks up against what you have just learnt. What you discover now may just save you a whole bunch of trouble and expense down the road.


