


Dyneema Rigging – Would I Do It Again?
Current Position: 18°28.41'N, 64°34.61'W
Distance sailed since last post: 421 nautical miles
It is time for s/y Ventus to have new rigging. So our friend Nick asked me if, starting from stainless rigging, I would still recommend the switch to Dyneema Dux (Dux is a heat treated dyneema that increases its strength).
That is not a simple question, so it deserves a considered response. Here are my thoughts:
The Good
Back in 2011 our stainless rigging was 10 years old. So it was time to replace it, and we decided we would do just that when we made it across the Atlantic to Gibraltar where we could import stuff tax free. Before we did the crossing, we checked all the rigging and everything looked good.

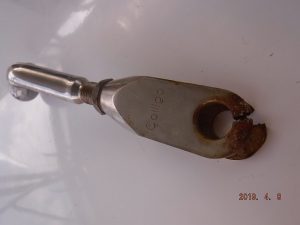
This is why I don’t like stainless steel
When we got to the other side, we were shocked to find that two of the fittings holding up the shrouds had died. One was for a shroud, the other for the forestay. When I say ‘died’ I mean that they had a big crack in them that had actually separated such that the shroud/forestay was about to fall down.
That is pretty scary and, for us cruisers, is probably the main argument in favour of Dyneema. The problem with stainless steel is that it can develop crevice corrosion .This most often occurs in places where there is stagnant water and little oxygen. In other words in places where you cannot see it. Like your chain plate bolts. And one also gets stress corrosion cracking when the metal is subjected to stress and sea water. Such as the rigging fittings. In fact, it appears that our friend, 316 stainless steel, is actually one of the worst alloys for stress corrosion cracking. Both of these mean that generally you have no idea that it is happening until the item fails with a big bang and something falls down or off. Not good. It can happen on your end fittings, especially swages. And it can happen inside your steel rope, even while the outside continues to look bright and shiny.
Dyneema does not have that problem. It IS affected by UV light which makes it all go fluffy and, over the space of about 8 years will cause it to lose about 50% of its strength. But since when you put it up it is about three times as strong as the steel wire you are replacing, that is not a huge concern.
Dyneema is also very light. In fact it floats, much like polypropylene does. When we switched from steel to dyneema in 2011 we lost about 150lbs of weight from the boat. This year, eliminating the stainless fittings lost us even more.
It is soft and easy on the hands when grabbing a shroud as you walk by. It is easy to splice (and re-splice). It has high abrasion resistance and is actually very hard to cut with a knife. When I do the splices I use a wire cutter to cut the strands. It can also be cut with a heat knife fairly easily.
It is an electrical insulator – which may (or may not) affect your strategy for mitigating lightening strikes.
Really the only downside to the fibre is that over time if under constant tension it will very gradually ‘creep’ – ie extend in length. This is not the same as stretch, which, like with steel, is minimal. So to deal with this you need to size the rope to keep the creep at manageable limits, which is why you end up with rope 3 times as strong as the steel.
So, with all these advantages, what’s not to love?
The Bad
Dyneema rope is great. But you still have to connect it to your boat and your mast, and that needs to be thought through.
Another failed stainless fitting. And only 7 years old.
The first step is to use the correct terminators (like thimbles, but more solid and made of aluminum) in the eye splices at each end. They come with a nice hole through which you can put a pin or bolt and the connect it to something.
But that is where the problem starts. To what do you connect it? When we changed to dyneema in 2011 we simply got some 316 stainless steel adaptors that would connect our dyneema shroud to the mast in the same way as it was done previously, ie using a ‘stemball’ which is rather like a ball in socket joint.
But you see the problem? We are back to stainless again. And, last year, three of those stainless fittings died, at the age of just 7 years. One of them failed as we were sailing past St. Vincent, dropping our lower shroud onto the deck. It wasn’t the dyneema at fault. It was the stainless steel, again.
So we are really no further ahead.
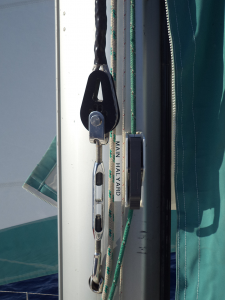
The terminator, turnbuckle, and stemball fitting at the bottom of the diamond stay. This year we also covered the dyneema around the terminator with self-amalgamating tape.
At the other end we have another stainless fitting that connects the terminator to a normal bronze (chrome plated) turnbuckle. This allows us to tension the rig as normal, and also to take up the creep each year. Although these too are stainless, so far they have not given us any worries and show no signs of corrosion or cracking. Is it their location? Or better quality steel? Who knows. But they are at deck level so easily seen, and we keep an eye on them.
This year we decided to do away with those upper stainless fittings altogether. The technology was not available in 2011, but since then John Franta, of Colligo Marine, has designed a ‘cheeky tang’ fitting. This is a new-style terminator that is spliced into the upper end of the shroud. It is then attached to the mast by passing a titanium bolt through the cheeky tang, through the mast and then out through the other cheeky tang on the other side. An alternative to the titanium bolt would be the super-austentitic stainless steel alloy al-6xn.
Voila! A simple and effective solution that eliminates stainless steel crevice corrosion and stress corrosion cracking.
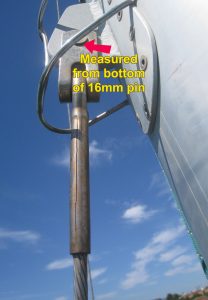
To convert to the cheeky tang from the stemball fitting requires cutting back the old fitting to make it flush with the side of the mast. I did that using about half a dozen 4 inch cutting discs on my battery operated drill. Not an easy job, and don’t forget to wear the safety goggles. Actually it might not be totally necessary to cut off what protrudes, as long as the bolt is long enough, but it is a neater finish. To measure the width of your mast, take off a stay from both sides and pass a rod through the mast, marking it on each side where it comes out. We could have done with our bolts being just 1/4 inch longer.
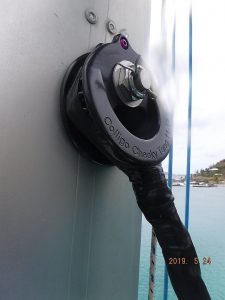
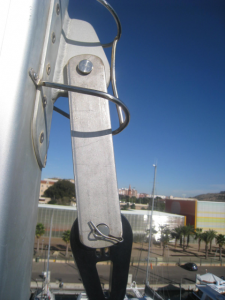
The cheeky tang bolted to the mast. Note the self-amalgamating tape wrapped around the dyneema to protect from UV damage.
If you decide to switch from stainless rigging to dyneema, give careful thought to the terminators and see if you can eliminate all stainless fittings from (at the least) the top of your mast. Also, whatever metals you used, if you have two different metals touching each other, use some Tef-Gel or even just some electrical tape to separate them so as to prevent galvanic corrosion. USP Anhydrous Lanolin (ask your pharmacy or order online) also prevents galvanic corrosion.
The Ugly
Now we come to the nitty gritty part of doing the switch. In theory it is very easy. In fact it differs little from putting in new stainless rigging. Just measure the old ones, order some new ones, and replace the former with the latter.
The devil, as they say, is in the details.
If you take your boat to a rigger to change the rigging, they will take down one shroud, bring it into the shop, lay it along their long bench, and cut and swage a new wire to the same length.
Unless you can find a rigger who does dyneema (pretty rare, still), you cannot do that. What you have to do is measure it, order the lengths and then, when you get them, hope they are correct and the switch them over. As you will see, even that is not as simple as it sounds.
First, how do you measure it? You are talking about a piece of string that is about 50ft long and has to be measured to within a half inch of accuracy. That is 0.1% tolerance.
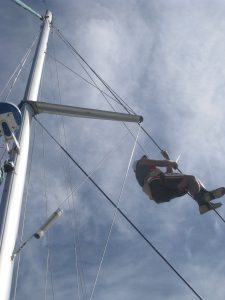
Trying to measure an angled shroud is not easy
Method one is to climb up the mast and try to measure it in situ. You can try to ‘walk’ a tape measure down the shroud (and over the end of the spreader) while you hang onto the angled shroud in your bosun’s chair with your third hand. Not easy.
Or you could take a solid rod of known length and walk that down the shroud.
Or you could take up a long string or rope and attach it at the top (making note of the length allowance you need to make for your knot) and then stretch it down to the bottom. You then mark the string at the correct length at the bottom. Then climb back up the mast, take the string down, and measure its length.
But how long is a piece of string? It depends on how tight it is. Since you are trying measure a shroud that is at an angle to vertical, you will have to tension that string significantly in order to get the sag out of it. That will lengthen it. Quite a bit, given it is 50ft or so. Then when you bring it down, you need to tension it to the exact same tension so as to get an accurate measurement. The solution to that is to use some dyneema string (say 3mm – 1/8inch) that won’t stretch much when you tension it. Whatever you do, don’t use nylon!
All of these methods have significant challenges. It is hard to measure, accurately, your existing rigging.
The second method is to take the rigging down and, like the rigging shop, lay it down on a long flat surface (like a dock) and measure it in sections with a tape measure. Or, better yet, a long 100ft tape measure like the landscape gardeners use. Then you have to put it all back up again while you wait for your new rigging to arrive.
Be very clear exactly what you are measuring.
Be very aware when you make your measurements exactly what you are measuring. Since you will probably be changing how the rigging will be attached at each end, you will need to make adjustments to the length to take into account the new terminator systems. For instance, we made our measurements up to the bearing surface of the stemball fitting where it goes into the mast wall. Just be very clear exactly what your measurements are measuring. Your goal is to receive a shroud that will just fit into the turnbuckle, leaving you with ample space to tension your rig and, over the years, to take up the creep that will gradually develop.
Do each measurement multiple times, and for both sides of the boat, until you are confident that you are getting reproducible consistent results that make sense. You will never get two measurements that match. So then make an adjustment that gives you a worst case/best case range that is still usable with the range you have available in your turnbuckles.
As you can see, just getting the measurements done takes multiple trips up the mast.
But your woes are not over yet.
You have the measurements. And they are accurate and reproducible. You send them off to John, and he makes up some new shrouds for you, complete with your new terminator system, and sends it back to you. He is very accurate in his lengths.
But when you receive them, they won’t match the lengths that you ordered. They will be too short, and you won’t be able to fit them on your boat.
What the heck is going on?
The problem is ‘construction stretch’. John will make up the shrouds to the correct length, and will pull them to 4,000 lbs of tension. That will get the splices to settle in, and everything will be hunky dory. He will even put heat shrink tubing over the splice to hold it all together nicely. Dyneema that has been well tensioned goes very stiff and hard, almost like a rod.
But then the rope gets rolled up and packed in a box and sent to you. Just doing that loosens up the braid and causes the rope to get fatter and shorter.
To get it to fit on your boat you need to pre-stretch it again. That means finding some way to pull it hard with your winches. Either put it up the mast and pull down. Or pass it round a block or two at your bow(s) and bring it back to your biggest winch. And tighten it. And then tighten it more. Then go and ‘twang’ the tight rope, pulling it sideways to tighten it even more. Then leave it for a while to ‘relax’. Then tighten it some more. When you are sure you can’t tighten it any more then try to fit it onto your mast. You won’t be able to stretch it to 4,000 lbs, but maybe this time it will fit.
Our main shrouds do not use stemballs, so a couple of flat side plates are used to connect the terminators to the mast. These are the longer temporary plates that we used initially. Later we went back to shorter plates.
If it doesn’t, then make some kind of temporary extension to the end fitting. Put it all in place and crank up your turnbuckles. Go for a sail. Tack a few times. Tighten up the turnbuckles some more – always on the leeward side, of course. Then bring it all back to your anchorage, and you can probably remove your temporary extension. Yes, that is exactly what we did in 2011.
As you can see, measuring, ordering, and fitting your new dyneema rigging is a lot of work – and many trips up the mast. You will probably screw up your measurements somewhere along the way. It all takes time.
The UV Problem
Unprotected dyneema will last you about 8 years. But what if we can put a covering over the rope so that it does not degrade with ultraviolet? Indeed, the heat shrink that John puts over the splices does just that, and the rope that is covered looks basically brand new (but dirty) compared with the uncovered rope.
That was our goal for this year. We decided that we would cover the entire lengths of the shrouds and stays with a combination of heat shrink and self-amalgamating ‘Rescue Tape’.
Again this proved to be more challenging than expected. The biggest problem being that the roll of heat shrink tubing that we ordered said ‘Store below 70 deg F’! Oh yeah? On a boat in the TROPICS? So it contracted back on itself and we were unable to easily thread the new ropes into the tubing. So we had to put the tubing on the size below – i.e. the tubing intended for our 13 mm main shrouds was put onto our 11 mm lower shrouds. Quite a bit of work threading it through (use a stout knitting needle with some 3mm string taped firmly to it), but we got there in the end. Our hair dryer from our big inverter then did a fair job of shrinking it onto the rope.
The self amalgamating tape also seems to work quite well, especially for putting over the eyes, but it is clearly not as tough as the heat shrink.
I think this is a solution that has potential. The proof will be in another 8-10 years when we see how it holds up to normal use. In this case we were able to do this because we actually made up our own shrouds, splicing then ourselves, as we did not fully trust the whole measuring business. The splicing is not hard, but you do have to pull the completed splice HARD to take out all the construction stretch. John may well be able to put on the heat shrink on the whole length for you when you order your rigging.
At this point we have done all the rigging except the main shrouds as we need to get some more heat shrink to cover those.
Conclusion
Would we do it again? Yes, because I really, really, don’t like 316 stainless steel for critical applications. And the weight loss is also nice. But it is a LOT of work installing the rigging – hence my desire to find a way to make the dyneema last longer so that it is a LONG time before I have to do it again.
Of course, over time there will be more and more riggers who are able to do it for you, which will take the stress out of it (and the dollars out of your pocket). Or you can make them up yourselves. Not hard to do, but the challenge is pulling the ropes hard enough, and you will probably have to re-do the splices a couple of times as you figure out the correct length and allowances for the shortening caused by the splice. It seems to be about 7% of the length of the bury – which itself is 72 times the diameter of the rope. And next time we can re-use the terminators and cheeky tangs, so won’t have to buy those again.
Some Q’s & A’s
What about spreaders?
Our diamonds go over the spreader ends. It is not ideal to bend any rope or cable over a sharp angle. However, your dyneema is 3 times as strong as your old steel, so losing a bit of strength is not a huge worry. However, chafe can be. So we wrapped the dyneema in some nylon webbing before putting it into the slots at the end of the spreaders. This prevents any chafe from the dyneema rubbing against the aluminum, and also protects it from UV degradation, thus preserving its full strength. We then sew a vinyl or leather ‘boot’ over the end of the spreader that keeps everything neat and tidy. If your genoa rubs against the spreader ends you would definitely want to do that.
What about chafe?
Dyneema is very resistant to chafe. Even so, persistent chafe will cut through anything, If you have a situation where something is repeatedly rubbing against the shrouds, such as a genoa sheet, you might want to put a solid plastic tube (commonly done with stainless steel rigging) over the lower section of the shroud so that it can roll when you move the sheets.
What about roller furling?
Unfortunately at the moment there is no solution for using dyneema inside the aluminum extrusion on a genoa roller furling system. This is mostly a size issue, since the dyneema is just that bit fatter for the same strength ( and sizing for creep). So we are still dependent on stainless steel for that. 🙁 One day, maybe…
Having said that, John DOES have a dyneema solution for soft furling applications, like gennakers.
Where to Buy your Rigging
John Franta of Colligo Marine is really the pioneer in dyneema dux rigging. He is super helpful, and is constantly adding new and ingenious solutions to his line of products – like the cheeky tangs which are excellent. Note that dyneema DUX is not the same as ordinary dyneema. Get the right stuff.
What do you look for to say it is dying?
I don’t know for sure – the main thing seems to be that the surface becomes fuzzy from UV damage. The parts that are completely covered by the heat shrink show no such damage. How bad the fuzziness has to be to indicate that it is dead, I don’t know – for that I go on the 10 year recommendation. I did have the old ones tested by Coligo when I changed the rigging last time and at that point it was still stronger than our steel rigging would be. That time when we replaced it, we covered the entire length of the new rigging with heat shrink tubing, so we now expect that it would last double the original 10 years.